Restaurant kitchens produce large quantities of grease and the residue builds up over time. That's why grease traps are so important. They are designed to intercept fats, oils, and grease (also called F.O.G.) to prevent damage to pipes and water systems. For high-volume kitchens with many grease traps, hiring a service may be the most practical option. If you operate a smaller business, you can maintain your own grease traps by following our step-by-step instructions.
Restaurant Grease Trap Cleaning

The best time to clean out a restaurant grease trap is when the business is closed to customers. Grease traps can put off a very strong odor, especially if they haven't been cleaned regularly. It's recommended that this messy job be handled when there are no customers on the premises. Follow these steps to perform a grease trap cleanout:
1. Gather Your Supplies
Before you get started with cleaning your grease traps, you'll need to gather a few supplies. We highly recommend suiting up with PPE to prevent skin contact with grease, chemicals, and bacteria. A nose plug will help with the foul odor associated with grease traps. Collect these grease trap cleaning supplies:
- PPE: Rubber gloves, safety goggles, coveralls, nose plug
- Cleaning Supplies: Wrench for opening the trap, ladle or scooping tool, airtight container, steel wool scrubber, dish soap
- Equipment: Wet / dry vacuum
2. Locate the Grease Trap
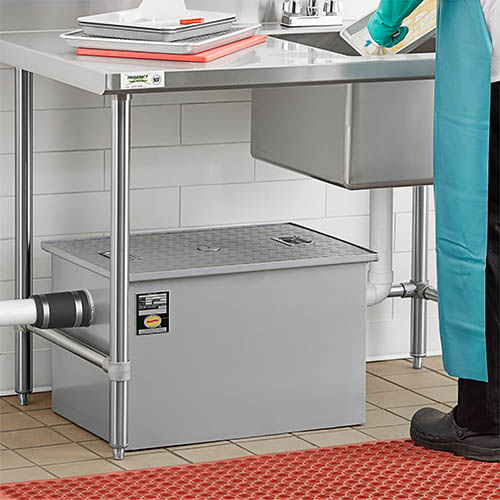
The kitchen grease trap is located close to your commercial sinks. Look for a large box underneath the sink basin or under a panel in the flooring. The size of the grease trap will vary depending on how much wastewater your kitchen produces. Once you locate the grease trap, make note of which sinks connect to the trap.
3. Run Cold Water through the Trap
After you've located the grease box, run the cold water in the corresponding sink. Let the water run for a couple of minutes and then wait ten minutes before opening the grease trap. The cold water will ensure that all grease, fats, and oils will harden for the easiest cleanup.
4. Turn off the Water Supply
To begin the cleaning process, locate the shut-off valve for the water supply to the grease trap and turn it off. This will prevent any water from entering the trap while you are cleaning it, making the process more manageable.
Turning off the water supply is essential to avoid any overflow or spills during the cleaning process. It also allows you to work on the grease trap without any interference.
5. Remove the Grease Trap Cover

Using a suitable tool, such as a wrench or screwdriver, carefully remove the cover of the grease trap. Place the cover in a safe location away from the work area to prevent any contamination.
Be cautious when removing the cover, as it may be heavy or slippery due to grease buildup. Take your time and ensure a firm grip to avoid accidents or injuries.
6. Remove the Layer of Grease
F.O.G. will be congealed at the top of the grease trap. Scoop or scrape it off with a ladle and put it in a closed container for proper grease disposal. Inspect the grease trap to make sure all accumulated grease and debris are effectively removed, allowing for better drainage and preventing clogs.
7. Remove Water and Debris
After the layer of grease is removed, you will still be left with water and other solid debris at the bottom of the tank. Use a wet / dry vac to clean up the wastewater and food solids from the bottom of the trap.
8. Clean the Tank and Components
With everything removed from the tank, you can now clean the sides and baffles. There may still be greasy residue on the insides of the trap. To tackle this mess, use a solution of warm water and dish soap and scrub the components with a steel scrubber.
9. Rinse and Reassemble
After all the greasy residue is scrubbed away, it's time to rinse the grease trap. Pour a gallon of warm water down the sink drain to rinse the trap clean. Make sure that the water flows freely in and out of the trap. Repeat if necessary to clear away leftover soap or solids. Reassemble the baffles and close the lid on the trap.
Grease Trap Cleaning FAQ

If you're still looking for answers, check out these commonly asked questions about cleaning a grease trap:
How Often Should I Clean a Grease Trap?
For small to medium-sized restaurants, it is generally recommended to clean your grease trap every 30 to 90 days. However, establishments that produce a high volume of grease, such as busy restaurants or those with heavy frying operations, may need to clean their grease trap more frequently, possibly every 30 days or even more often.
How to Know if a Grease Trap is Full?
One of the first signs that a grease trap is full is a strong, unpleasant odor emanating from the trap or surrounding area. The accumulation of grease and food particles in the trap can produce a rancid smell that is hard to ignore. If you notice that water is draining slowly from sinks or other fixtures connected to the grease trap, this is also a sign that the trap is full. The buildup of grease and solids can impede the flow of water, causing drainage issues.
When Should I Hire a Professional Grease Trap Cleaner?
While regular cleaning is necessary to prevent clogs and backups, there may be instances where it is more appropriate to seek the expertise of a professional cleaning service. Call a grease trap professional if you're experiencing the following:
- Large Volume of Grease: If your kitchen produces a significant amount of grease, it may be more efficient to hire a professional cleaning service with the expertise and equipment to handle the job effectively.
- Lack of Time or Resources: If your kitchen staff is already stretched thin with daily operations, outsourcing grease trap cleaning to a professional service can save time and ensure thorough cleaning.
- Regulatory Compliance: Some jurisdictions have specific regulations regarding grease trap maintenance and cleaning. Hiring a professional service can help ensure compliance with these requirements.
Keeping track of when the grease trap was last serviced and the volume of grease removed can also help you gauge when it might be nearing full capacity. Establishing a routine maintenance schedule based on previous service intervals can help prevent overflows and backups. By staying proactive and adhering to a regular cleaning schedule, you can prevent costly plumbing issues and ensure the smooth operation of your kitchen.


