


Whether you own a professional or home bakery, mastering the art of pie crust designs can impress your guests and elevate your desserts to the next level. Our easy-to-follow tutorial and accompanying video will guide you through the process of creating a variety of pie crust styles, including beautiful lattice and decorative cut-out designs, that will make your pies stand out.
Five Easy Pie Crust Designs
There are countless ways to make your pie crust look as delicious as it tastes. We'll show you how to easily make five pie crust designs, from the classic crumble crust to a decorative heart pie crust! Each of the pie crusts can be made using our basic pie crust recipe. Watch our video tutorial on how to make different pie crust designs or follow our step-by-step guide with pictures below:
What Special Equipment Do I Need?
Fortunately, many of these pie designs do not require special tools to create once you've rolled out your dough. Below are the standard items you'll need for each pie design - we'll note any special tools needed in each pie crust design's directions.
- Pie Pan: Either a metal pie pan or a disposable pie pan will do.
- Knife: Some pie styles will require you to trim the excess pie dough with a knife.
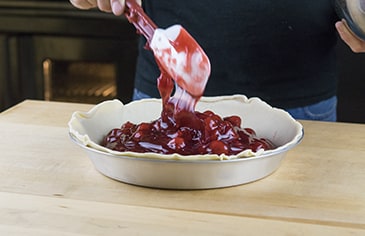
1. Crumb Crust Pie
A crumble crust is ideal for fruit pies like apple, blueberry, and cherry pie. This delicious crust can also form the bottom layer of bar and cheesecake recipes.
Crumb Crust Ingredients
- 1/2 cup flour
- 1 cup packed brown sugar
- 1/4 cup oats
- 1 stick butter, softened
- 1 Tablespoon cinnamon
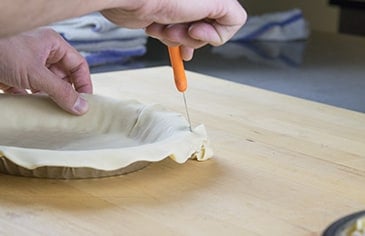 1.
1.Grease pie pan, add your prepared bottom crust to pie pan, and use knife or kitchen shears to trim off excess dough.
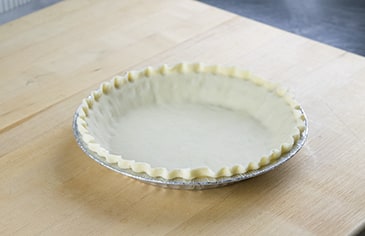 2.
2.Crimp pie crust edge.
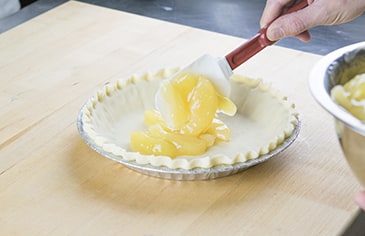 3.
3.Add in pie filling.
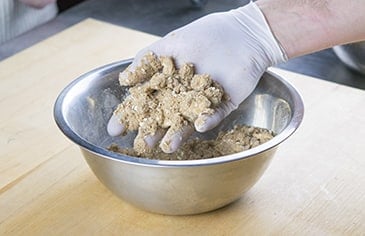 4.
4.In mixing bowl, combine crumb crust ingredients and hand mix.
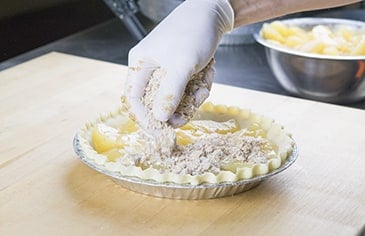 5.
5.Cover pie with crumb crust topping and bake according to your recipe's instructions.
2. Lattice Pie Crust
The classic lattice pie crust is made by weaving strips of pie dough on top of the filling, creating a visually appealing basket weave pattern. This decorative technique not only enhances the pie's appearance but also allows steam to escape through the gaps between the dough strips, making it great for fruit-filled pies.
 1.
1.Grease pie pan and add your prepared bottom crust to pie pan.
 2.
2.Add in pie filling.
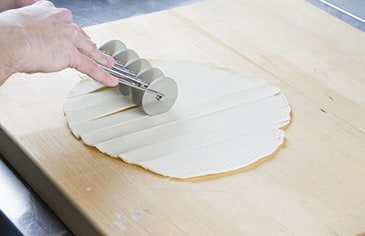 3.
3.Use pastry wheel or dough cutter to cut prepared top crust into 1-inch strips.
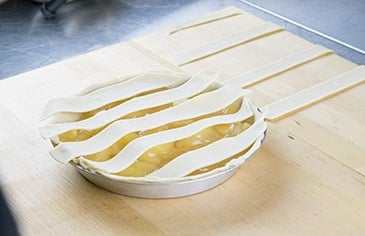 4.
4.Lay half of strips vertically and evenly spaced on top of filled pie. Leave about 1/2 inch of space between each strip to allow for weaving.
 5.
5.Take two strips of dough on either side of center strip and gently lift them, folding them back halfway. Place another strip of dough horizontally across pie filling, above folded strip. Unfold folded strip back over horizontal strip. Repeat this process with remaining vertical strips, alternating over and under each horizontal strip.
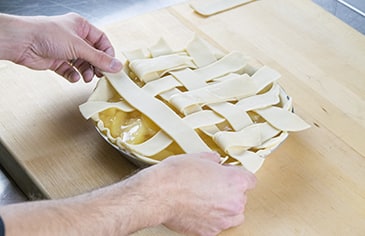 6.
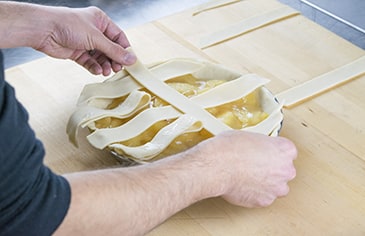
6.Take next set of vertical strips and fold them back, placing another horizontal strip over them. Unfold folded strips and repeat process until you have completed lattice pattern across the entire pie.
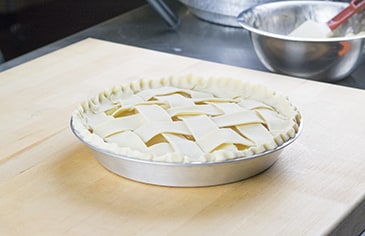 7.
7.Once lattice is complete, crimp bottom and top pie crust edges together and bake according to your recipe's instructions.
3. Double Pie Crust
A double crust pie is a type of pie that has both a bottom and top crust. It is a classic and versatile pie style that can be filled with a variety of sweet or savory fillings. The double crust not only adds an extra layer of flavor and texture but also helps to seal the filling and keep it moist during baking. Just be sure to be sure to vent it so you don't rupture the top crust.
 1.
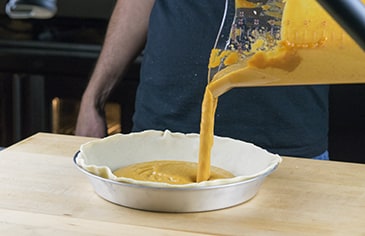
1.Grease pie pan and add your prepared bottom crust to pie pan.
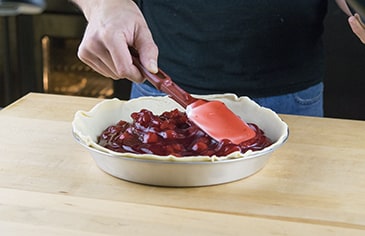 2.
2.Add in pie filling.
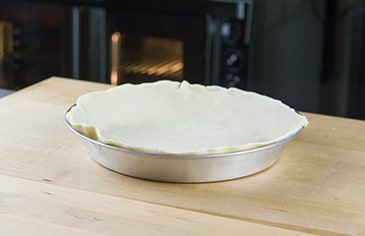
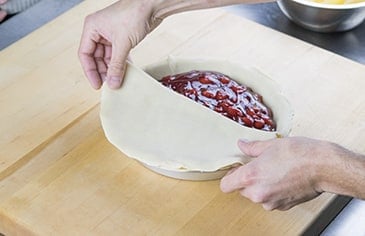 3.
3.Lay prepared top crust on top of filled pie.
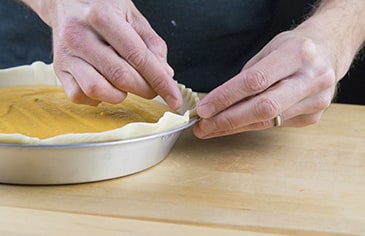
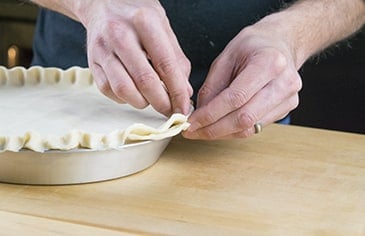 4.
4.Crimp bottom and top pie crust edges together.
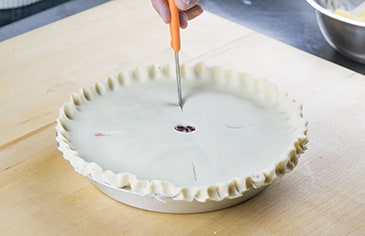 5.
5.Use knife to cut small hole out of center of pie and make four diagonal slits around hole to allow steam to vent. Bake according to your recipe's instructions.
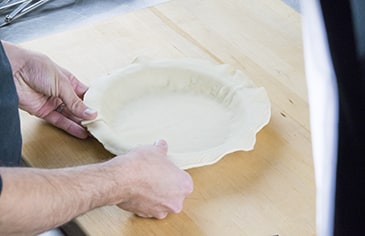
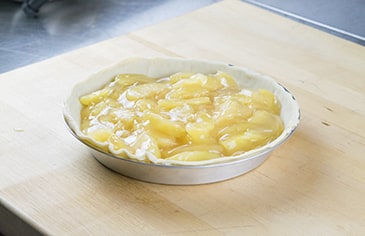
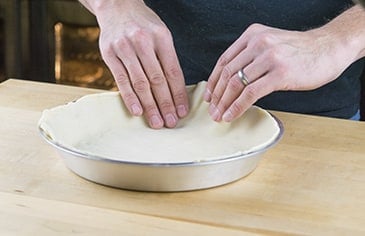
4. Single Pie Crust
The easiest out of all the pie styles to make, a single crust pie is a type of pie that only has a bottom crust and no top crust. It is often used for pies that have a custard, cream, or fruit filling that does not require a top crust for baking.
 1.
1.Grease pie pan and add your prepared bottom crust.
 2.
2.Add in pie filling.
 3.
3.Crimp pie crust edge and bake according to your recipe's instructions.
5. Cookie Cutter Heart Pie Crust
One way to create visually appealing and unique pie crust designs is by using cookie cutters. In this tutorial, we use a heart-shaped cookie cutter, but you can use virtually any cookie cutter shape or theme to cater to a special occasion or holiday.
 1.
1.Grease pie pan and add your prepared bottom crust.
 2.
2.Add in pie filling.
 3.
3.Place prepared top crust on clean work surface and use pie pan of equal diameter and knife to trim off excess dough.
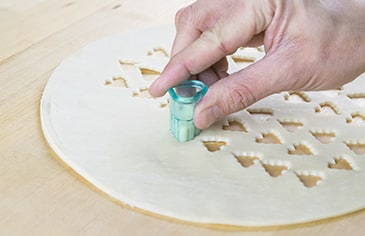 4.
4.Starting in crust's center, use cookie cutter to cut out rows of hearts. Make sure to leave about 1/2 inch of space around edge.
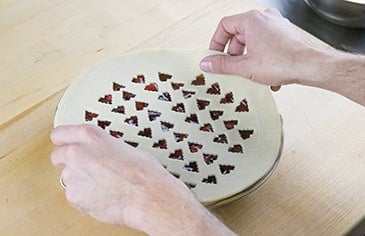 5.
5.Place decorative top crust onto pie.
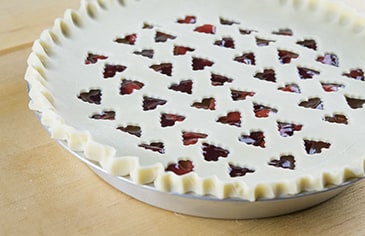 6.
6.Crimp bottom and top pie crust edges together and bake according to your recipe's instructions.
Basic Pie Crust Recipe
Creating a delicious pie starts with a basic pie crust recipe. This simple recipe is easy to make and consistently produces a buttery, flaky pie crust. With just a few ingredients, you can create a foundation for a wide variety of sweet and savory pies.
Ingredients
- 2 1/2 cups all-purpose flour
- 1 Tablespoon salt
- 1 Tablespoon sugar
- 2 sticks cold unsalted butter, chopped
- 4 Tablespoons ice water
Directions
- Combine dry ingredients and chopped butter in food processor. Blend until mixture begins to look crumbly.
- Slowly add ice water and continue blending. Dough should start to form large clusters.
- To check if it's ready, pinch some dough - if it holds together, it's good to go. If it falls apart, add 1 more tablespoon of ice water at a time and blend until dough comes together.
- Transfer dough from bowl onto clean work surface and lightly work it to form a ball.
- Wrap dough with plastic wrap and refrigerate for at least one hour, or up to two days, before using it in your recipes. Alternatively, you can freeze it for up to three months (thaw it overnight in fridge before using).
Pie Crust Tips
To achieve a beautiful and flaky pie crust, it's important to follow a few key tips. By keeping your pie crust cold, using a quality pie crust, and avoiding excessive handling of the dough, you can create a pie that not only looks stunning but also tastes amazing.
- Keep the Pie Crust Cold: One of the most crucial aspects of working with pie crust is to ensure it stays cold throughout the process. This is because cold dough is easier to handle and results in a flakier crust. To keep your pie crust cold, chill all the ingredients, including the flour, butter, and water, before you start making the dough. Additionally, refrigerate the dough for at least one hour before rolling it out. If the dough becomes too warm while you're working with it, place it back in the refrigerator for a few minutes to cool it down.
- Use a Quality Pie Crust: The quality of your pie crust can greatly impact the final result. Homemade pie crusts allow you to control the ingredients and ensure a flaky, buttery crust. Our basic, buttery pie crust recipe is tried and true and suits all skill levels.
- Don't Handle the Dough for Too Long: Overworking the dough can lead to a tough and chewy crust. When mixing the ingredients, aim to combine them just until they come together. Avoid kneading or overmixing the dough, as this can develop the gluten, resulting in a less tender crust. Once the dough has been formed, roll it out gently and as quickly as possible. The more you handle the dough, the warmer it becomes, which can lead to a less flaky crust.
- Blind Bake the Crust: If you're using wet or custard-like fillings, consider blind baking the pie crust before adding any fillings. Blind baking involves pre-baking the crust without any filling, which helps prevent a soggy bottom. By blind baking the crust, you'll ensure a crisp and flaky base for your pie, allowing your intricate designs to shine. Use pie weights to achieve the perfect blind bake.
Ditch the same old pie routine and master new pie crust designs that will leave your guests in awe. With our decorative pie crusts tutorial, you can confidently create a variety of designs, including the simple crimped edge single crust or the timeless lattice pattern that are perfect for your Thanksgiving feast. Elevate the visual appeal of your pies to match their mouthwatering taste with exquisite and detailed designs.