How to Clean and Organize a Commercial Fridge
Last updated on Jan 14, 2026Richard TraylorIn foodservice establishments that depend on cleanliness, a cluttered, disorganized, and dirty fridge can be a major problem. Not only can a dirty fridge cause bacteria to grow, but it can also cause your fridge to use more electricity and shorten its lifespan.
Restaurants that are operating as take-out and delivery only establishments or are completely closed due to COVID-19 can use this opportunity to do a deep clean and organization of your walk-in coolers and freezers. In this blog post we'll cover step-by-step instructions on how to clean and organize your commercial refrigerator, walk-in, or freezer!
7 Steps to Clean Your Fridge
Before you can re-organize your fridge, you should first clean it out, remove all expired food products, and sanitize everything. Here's how to clean your fridge step by step:

1. Unplug Your Refrigeration Units
To eliminate the possibility of electrocution, the first thing you should do is unplug your refrigerator or freezer. It’s a quick and easy step, but it’s also vitally important to preventing work-related injuries.
2. Empty Each Shelf of All Items
The second step should be to remove all of the products in your fridge or freezer. Make sure to actually remove the containers, don't just move them to the other side of the fridge.
3. Throw Away Any Expired or Moldy Food
Perishables can easily get lost in the mix by being pushed to the back or concealed behind other items in a large refrigerator. Don’t save anything you suspect of being spoiled – it’s not worth the risk of making a customer sick.
Already-opened cans and jars are other offenders to consider throwing in the trash (unless they’ve been properly labeled with the date and time of their opening). Live by the mantra, “When in doubt, throw it out.” Any other food or ingredients you haven’t used for months (or that you don't plan on using in the next few weeks) should also be tossed into a trash can or a recycling bin.
4. Completely Wipe Down the Interior of the Refrigerator or Freezer
Get a bucket with warm, soapy water and your choice of sponge to thoroughly clean your commercial fridge or freezer. Highly absorbent microfiber cloths and mitts are perfect for scrubbing down every inch inside your fridge and removing messes that have accumulated since the last cleaning.
If you're having trouble reaching grime or stuck-on stains in tight corners, try using a simple toothbrush because the bristles are flexible and strong, helping to get into small spots and then scrub away the dirt. After you've thoroughly scrubbed down the interior of your fridge and freezer, rinse with clean water.

5. Disinfect with a Sanitizer
Bacteria and mold can accumulate in a fridge over time, so it’s important to disinfect surfaces with a sanitizer. Be sure to use a food-safe sanitizer, as you’ll eventually be placing items back into the refrigeration units. Since you’ve already washed inside, you don’t have to go overboard with sanitizing. A little goes a long way.
6. Vacuum the Condenser and Coils
Dust and debris saps the power being generated in your refrigeration unit's condenser and refrigeration coils by clogging air intake. Over time, dust and debris can collect on your refrigerator, which can end up clogging the air intake. As a result, your condenser and refrigerator coils will need to use more energy to take in air and keep your refrigerator cool, resulting in a less-efficient fridge and a higher utility bill.
You can solve this problem by regularly cleaning away the dust on your refrigerator coils. Start by removing the protective grill that is found either on the top or bottom of your unit. Brush the coils and the fan unit to free up dirt and dust. Use a vacuum to suck up all the debris, and reinstall the grill.
7. Clean Underneath and On Top of the Refrigerator or Freezer
Keeping the area around your refrigeration units clean can be just as important as cleaning the units themselves. Thoroughly mop the floor under and around the fridge or freezer. If your units have casters, be sure to pull them away from the wall to reach the walls and floor behind and beneath the unit. Don’t forget to dust the top of the unit, as well.
How to Load a Fridge or Freezer
Once your refrigeration units are completely clean, it’s time to plug them back in and place food on the shelves. When placing food back in your commercial fridge, make sure that you're using proper food placement procedures.
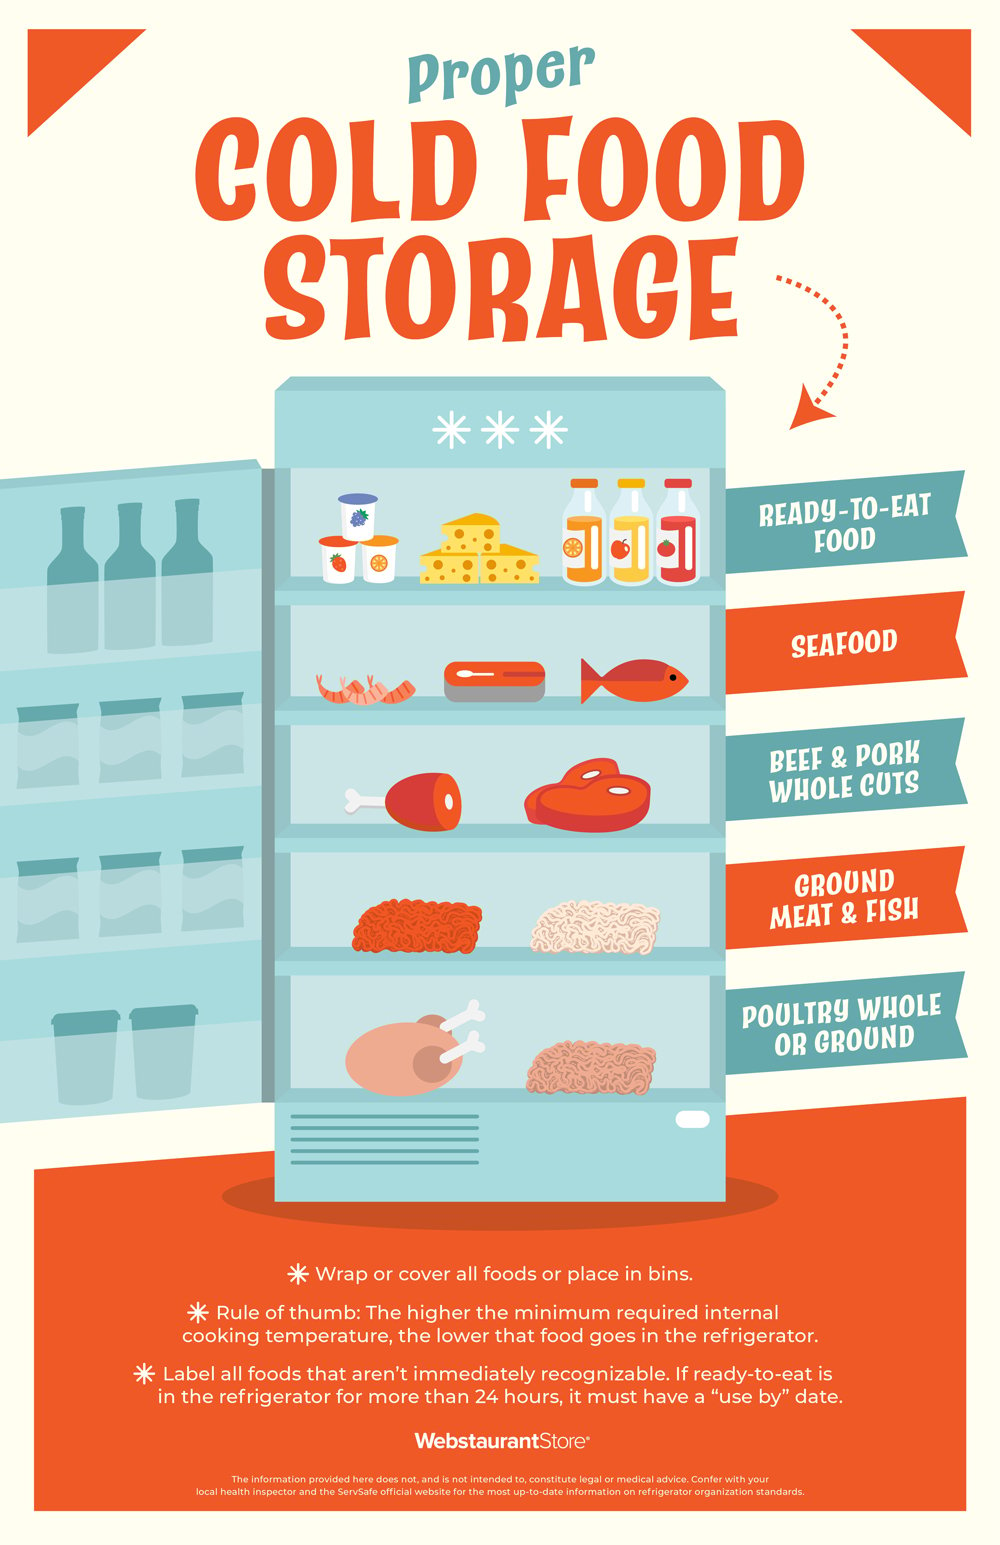
Here is how you should stock your fridge:
- Top Shelf: Ready-to-eat foods, produce, butter, condiments, pre-cooked foods
- Second Shelf: Seafood
- Third Shelf: Whole cuts of raw pork and beef
- Fourth Shelf: Ground meat and fish
- Bottom Shelf: Poultry
By placing raw meat and poultry on the lower shelves, you help prevent any juices and bacteria from dripping down and contaminating the food below it.
Organizing Your Fridge
There are also some helpful things you can do to organize your refrigerator and freezer and make it easier to find what you're looking for:
- Add labels to any opened products. Adding labels helps you track the freshness of your food, so you can dispose of it when it expires.
- Use color-coded bins. Using colored bins for different products makes them easy to differentiate, helping your staff find what they're looking for quickly.
- Implement the "First In, First Out" method. First In, First Out, also known as FIFO, is an inventory management method that ensures that you use the freshest food first and prevents food from staying in your fridge for too long.

Now that your refrigerators and freezers are clean and organized, you can start to see the benefits of keeping tidy units by limiting waste and saving money. Organizing and cleaning your fridge will cut down on food costs, ensure that you use your food more efficiently, cut down on food waste, and prevent bacteria from growing and spreading.


