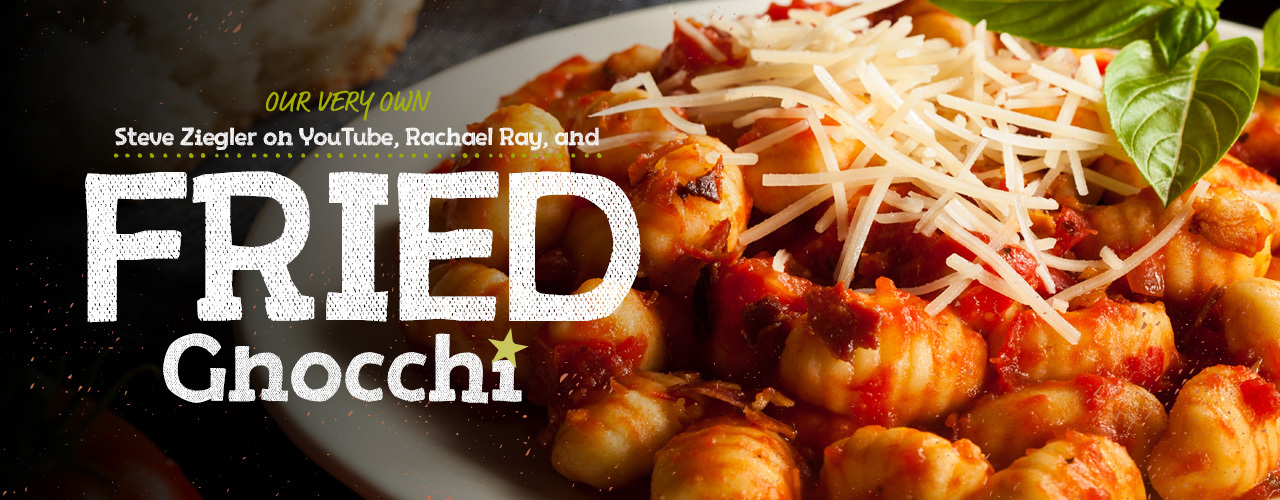
How Fried Gnocchi Got Steve Ziegler on The Rachael Ray Show
Last updated on Feb 25, 2026WebstaurantStoreOn July 27, 2015, one of WebstaurantStore’s own was featured on The Rachael Ray Show when his hilarious fried gnocchi fail went viral. Steve Ziegler, our product knowledge expert and social media specialist, was filming a video for our blog on how to make deep fried gnocchi with buffalo sauce when he discovered that one should NEVER fry gnocchi. To see why, check out the video below.
We sat down with Steve to talk to him about his experience with Rachael Ray and how it feels to be a viral video sensation.
Q: How did you feel when you were asked to be on the show?
A: It was kind of exciting because everybody knows who Rachael Ray is, so it seemed like a really interesting and fun thing to do.
Q: Why do you think the original video went viral?
A: Because I’m so good looking. I think we can all agree that’s the real reason. No, the original video went viral because the internet loves when unexpected things happen in a video, and they love real laughter. People seem to love the way I laugh.
Q: What was your reaction after seeing yourself on TV?
A: Relief that I didn’t completely mess up. I thought I’d look a lot worse than I did, and I didn’t stutter too much or anything like that so I was pretty happy.
Q: Did you do anything to prepare?
A: I had to buy a jewel-toned shirt at Rachael Ray’s production assistant’s insistence. I also got a haircut which was too short, and that was about it.
Q: How did the process from invitation to filming go? Were there any unexpected steps in the process?
A: Their production assistant actually reached out in several different ways to get ahold of me. She sent a message via our YouTube account and she called several customer service people here at WebstaurantStore. So I suddenly got an influx of messages from customer service reps in Pennsylvania and Nevada all within the same day, so I knew it was serious. After that, we figured out the logistics of when they were going to tape the show, which was back in March. Then I just had to go up to the studio in New York and be there on time.
Q: What was your favorite part about filming the show?
A: If you watch my reaction when I eat the gnocchi that the chef made, it’s a completely real reaction. It was super-duper tasty. It was so good, I’ve made it twice since in fact. My kids love it, my girlfriend loves it, it is really good.
Related Resources

Becoming a YouTube Chef
It's no surprise that social media marketing plays a crucial part in drawing attention to restaurants and menus, but what can you do to market yourself as a chef? Showcase your talent and exercise your creativity by starting your very own cooking show on YouTube. We'll walk you through creating content for a YouTube cooking channel that will have viewers flocking to your page to follow along. How to Start a YouTube Cooking Channel A successful YouTube channel takes a lot of work, but we've broken down how to start your YouTube cooking show into these simple steps: Watch a lot of YouTube cooking shows. Check out what others are doing, and see where you could add something new to the market. Form your concept around something you’re confident that you can do well with a unique perspective. Figure out how you will brainstorm, test recipes, film, and edit. Write up a schedule that works for your life and stick to it. Regular uploads (once per week or more) will help you retain followers. Create a storyboard for each show before you film. Practice talking viewers through the recipe, and think about what shots you want to get of your dish. Consider what will be most helpful and most enticing to your audience. Map out your video on a whiteboard before filming to stay organized. Create social media profiles to promote your channel. For example, post still images of your recipe on Instagram, or ask your followers to suggest new recipes on Twitter. How to Make Cooking Videos To launch a YouTube cooking show, you'll need to produce high-quality videos that your viewers can follow in their own kitchens. Below, we've included some of the recording essentials and key details you'll want to include for your cooking videos. Cooking Video Supplies Here is some of the equipment you'll need to film cooking videos: Camera: Whether it's your phone or a digital camera, you'll need a device with high-quality recording capacities and internal storage to capture the videos of your recipe. Tripod: To keep your shot steady and properly angled, use an adjustable tripod that can hold your device as you film. Lighting: Professional-looking videos need to be well-lit so that viewers can see the details of your recipe. You can use ring lights or professional studio lighting to make sure your kitchen is illuminated well enough for your camera. Microphone: Most cameras have built-in microphones, but they may not be as crisp as a professional option. If you're adding voice-over to your videos, an external microphone would be a great addition to your recording kit. Editing Program: Once you have all of your footage, edit the recording together to create the final product that you'll upload on your channel. Some of the commonly used editing programs include PowerDirector 365, Apple iMovie, Animoto, Lightworks, and Adobe Premiere Pro. Cooking Supplies: Make sure your cooking supplies are all clean and gathered before you start working on your video. This makes the filming process run smoothly and can help produce a professional finished product. How to Film Cooking Videos Once you have your filming equipment gathered and set up, your storyboard will help you collect the footage you need to put the video together. Follow these steps as you begin filming your YouTube cooking video: Set up your cooking supplies. Organize your cooking supplies and ingredients in a way that lets you flow from one logical step to the next while keeping your space tidy. Film an introduction. Record a small clip introducing yourself and the recipe you'll be teaching. Show the necessities. Grab footage or a still image of the supplies and ingredients your viewers will need to follow along with the video. Record the recipe. First, you'll need to decide if you'll be recording the prep straight through or grabbing individual recordings of each step. Recording without stopping allows very little room for error but lets the viewer follow in real-time. Individual recordings can be time-consuming but then you can re-record and stitch together only the best footage. Show off the final product. Finish by recording the dish coming out of the oven or refrigerator before you serve it. You can grab a video or still image of the dish plated and ready to serve to close the video. Edit the video and upload. Transfer all of the footage to a computer and edit together the clips. You may choose to add captions and voice-over to get it presentable before uploading. The easier it is to follow along, the better. How to Create Content for YouTube To gain a loyal base of subscribers, you should upload at least one video per week. However, you shouldn't rush and churn out non-descript recipes. Viewers want to see a unique twist on each dish you do because that's what will keep them interested. Here are some tips for planning your YouTube content: Create a content calendar. It’s easiest to keep your subscribers’ attention when you’re producing content for them regularly. Mapping out your videos on a calendar will help you stay organized. Try to account for running out of ideas as you plan your content. Creativity comes and goes in bursts, so consider producing more videos when you’re full of concepts. Keep an eye on trends. Just like with foodservice trends, you'll want to stay informed on what consumers want. Tune in to your competitors' channels and YouTube's trending page to see what people are watching. But, as always, put your own spin on these concepts to create original content. Ask your viewers what they'd like to see. Create a relationship with your subscribers so that you can create content that you know they'll be interested in. They can leave comments on your videos or social media accounts with ideas for you. Skills You Need to Start a YouTube Cooking Show Creating cooking content for YouTube means practicing your techniques and recipes frequently. You'll spend lots of time testing dishes, brainstorming plating techniques, talking to cameras, and thinking about each step in your recipe. Aside from basic cooking techniques, you'll want to make sure you can teach the recipe as you perform it. Break down your recipes into easy-to-understand steps. The key is to stay engaged with the camera throughout the video to bring in viewers and keep them watching. On top of being a great chef and teacher, you'll also need filming and video editing skills to compile your video and upload it for the world to see. How to Gain Exposure for Your Channel Joining the YouTube community will allow you to connect with hundreds, thousands, or even millions of people who love food as much as you. Each of these people is an opportunity for engagement and exposure that your channel needs to succeed. 1. Encourage Users to Like and Subscribe Including these helpful reminders in your videos calls your viewers to action. YouTube's algorithm favors videos with many likes and views, so high rates of engagement could help you be featured on other users' "recommended" feeds or even the trending page. 2. Engage with Your Subscribers Get to know your viewers by reading their comments and responding to some of them. Not only will this help your subscribers feel connected with you, but it can also help you gain insight into what your audience likes about you. Communicating with your audience could give you valuable feedback that you wouldn't have otherwise. 3. Collab with Other YouTube Creators Reach out to other YouTube hosts and set up collaborative projects. Most of the time, “collabs” include creating one video for each YouTuber’s channel, in which the visiting user gains exposure to the other’s audience. This allows you to interact with a whole new group of viewers and learn from fellow creators. How to Make Money on YouTube There are two main ways that you can make money from your YouTube channel: video ads and sponsored content. 1. Getting Ads on Your YouTube Videos When you gain enough subscribers and watch hours on your channel, you can “monetize” your videos, or allow YouTube to put ads on them. You earn money depending on the format of the ad put on your content, the price of the ad featured, or other factors set by YouTube. 2. Getting Sponsorships for Your YouTube Channel If you can grow your channel to have several thousand subscribers, product brands may start contacting you for sponsorship opportunities. Generally, a brand will ask you to use their product in your video and will compensate you according to terms set before you create the video. The bigger your base of viewers, the more attractive your channel will be to brands looking to promote their products. Becoming a Full-Time YouTuber For some people, creating a YouTube cooking show can change the path of their career. Growing your channel to a few hundred thousand subscribers could give you the opportunity to turn YouTube into your full-time job if your videos generate enough revenue. Be Prepared for the Time Commitment While YouTube gives you schedule flexibility, running a successful YouTube channel and its supporting social media profiles is practically a 24/7 job. Subscribers may want daily content on other platforms because they can’t get enough of your unique perspective. Learning how to balance your work with your personal life is a challenge that many full-time YouTubers face. When you work from home and your job is to be present on social media, it becomes difficult to know when to stop working. This is something to keep in mind if you want to pursue YouTube as your full-time income. If you want to explore opportunities for more creativity in your cooking career, consider starting your own YouTube cooking show. This endeavor could help you hone your skills, earn some money, and may even change your career. After working on YouTube full-time, some users find even more success by transitioning to network television. Having a successful YouTube channel is a big time commitment, but your dedication could take your cooking career to the next level.
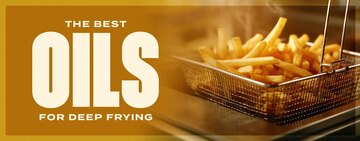
Choosing the Best Oil for Your Commercial Deep Fryer
When it comes to deep frying, choosing the right oil is crucial for kitchen safety and for creating delicious fried foods. Different cooking oils have a range of smoke points and flavors, making it important to consider these factors when selecting the best oil. Also, keep in mind that a commercial deep fryer holds several gallons of oil. Delicate oils that are expensive and break down quickly with heat will not be efficient or cost-effective for deep frying. Keep reading to learn more about the best oils for your deep fryer. Shop Cooking Oil Click below to learn about the best oils for commercial deep frying: How to Choose the Best Oil Recommended Oils Cooking Oils to Avoid Deep Fryer Oil FAQ What Is the Best Oil for Deep Frying? Vegetable oil and canola oil are two popular types of oil used for commercial deep frying because of their high smoke points. Which oil is the better option? Canola oil is often favored because of its neutral flavor, low saturated fat content, and balanced fatty acid profile. Vegetable oil, on the other hand, provides a more affordable and versatile option. It’s important to note that products labeled as “vegetable oil” are a blend of different plant oils and may contain canola, soybean, corn, or sunflower oil. Refer to the product label for the exact ingredients and the accurate smoke point. How to Choose the Right Oil for Your Deep Fryer When it comes to choosing an oil for your commercial deep fryer, there are several factors that you should consider. Each oil has its own set of characteristics, and understanding these factors will help you make an informed decision for your frying needs. Smoke Point: The smoke point of an oil refers to the temperature at which it starts to break down and produce smoke. Oils with higher smoke points are ideal for deep frying because they can withstand higher temperatures without burning. Some common oils with high smoke points include peanut oil, canola oil, and safflower oil. These oils are suitable for high-heat cooking and provide a crispy texture to fried foods. High Heat Stability: Deep frying requires heating the oil to high temperatures, so it is crucial to choose an oil that can withstand these heat levels without breaking down or oxidizing. Oils with high levels of monounsaturated fats, such as canola or peanut oil, are more heat stable and better suited for deep frying. Neutral Flavor: The choice of oil can greatly impact the flavor of your fried foods. While some oils have a neutral taste, others impart a distinct flavor to the food. For example, peanut oil adds a rich and nutty flavor, while olive oil provides a fruity and robust taste. It is essential to consider the flavor profile you desire for your dishes and choose an oil accordingly. Fat Content: Deep frying is often associated with unhealthy eating habits, but selecting the right oil can make a difference. Oils high in saturated fats, such as coconut oil or palm oil, are not the healthiest options for deep frying. Instead, opt for oils with healthier fat profiles, such as canola oil or sunflower oil, which are lower in saturated fats and higher in monounsaturated fats. Cost: The cost of oil can be a significant factor, especially for commercial establishments that use large quantities of oil for deep frying. Some oils, like peanut oil or avocado oil, can be more expensive compared to others. Consider your budget and the volume of deep frying you anticipate to determine the most cost-effective option. Allergies: It is essential to be mindful of potential allergens when selecting an oil for deep frying. Peanut oil is a popular choice due to its high smoke point and excellent flavor, but it can be problematic for individuals with peanut allergies. If allergies are a concern, consider using alternative oils like canola oil or soybean oil, which are generally safe for most individuals. Best Oils for Deep Frying We'll take a closer look at the best types of deep-frying oils and describe their benefits below: 1. Peanut Oil Peanut oil has a mild, nutty flavor that enhances the taste of fried foods without overpowering them. Not all peanut oils are considered an allergen, but it's recommended to avoid this product completely if you have a severe peanut allergy. Make sure to label your menu accordingly if you use peanut oil in your commercial kitchen. Flavor: Mild and nutty Smoke Point: 425 to 450 degrees Fahrenheit Cost: Slightly more expensive than some other oils 2. Canola Oil Canola oil is a neutral-tasting oil that allows the natural flavors of the food to shine through. It's also more affordable compared to other oils, making it a cost-effective option for commercial deep frying. Flavor: Neutral Smoke Point: 350 to 400 degrees Fahrenheit Cost: Affordable 3. Soybean Oil Soybean oil is one of the most economically priced oils available, making it a cost-effective option for commercial deep frying. Its wide availability also ensures that businesses can easily source it in large quantities, ensuring a steady supply for their frying needs. Flavor: Neutral Smoke Point: 400 to 450 degrees Fahrenheit Cost: Affordable 4. Sunflower Oil Sunflower oil's high smoke point ensures that it can withstand the heat without breaking down and compromising the quality of the food. This means that you can achieve crispy and golden results without the fear of the oil becoming rancid or imparting a burnt taste to your dishes. Flavor: Mild flavor Smoke Point: 440 to 450 degrees Fahrenheit Cost: Affordable 5. Cottonseed Oil Cottonseed oil is also a versatile option for commercial deep frying due to its ability to withstand repeated use. The oil's high smoke point and stability allow it to be reused multiple times without compromising the quality of the fried food or the oil itself. This can help to reduce overall costs and waste in a commercial kitchen. Flavor: Mild nutty flavor Smoke Point: 420 degrees Fahrenheit Cost: Generally affordable 6. Avocado Oil In terms of flavor, avocado oil has a mild and pleasant taste that does not overpower the food being fried. It's generally more expensive compared to other frying oils, but its numerous benefits can make it a worthwhile investment for the right commercial kitchen. Flavor: Mildly sweet and buttery Smoke Point: 520 degrees Fahrenheit Cost: More expensive compared to other deep frying oils 7. Blended Vegetable Oils Vegetable oil is one of the most convenient oils to use for deep frying because of its affordability and versatility. You will find that most vegetable oils are a blend of soybean, canola, corn, or sunflower oils. Flavor: Neutral Smoke Point: 400 to 450 degrees Fahrenheit Cost: Affordable Cooking Oils to Avoid When Deep Frying While some oils may be suitable for cooking methods like pan frying or sauteing, they may not be the best choice for deep frying in a commercial deep fryer. You'll need several gallons of oil to fill the tank on your deep fryer, so consider affordability. The oil also needs to remain stable at high temperatures and have a high smoke point. These are oils to avoid using in your deep fryer: Extra Virgin Olive Oil: One type of oil that is not recommended for deep frying in a commercial deep fryer is extra virgin olive oil. Although extra virgin olive oil is a popular choice for sauteing and dressing salads due to its rich flavor and health benefits, it has a low smoke point of around 320 degrees Fahrenheit. When heated beyond its smoke point, extra virgin olive oil can break down and release harmful compounds, resulting in a bitter taste. Coconut Oil: Although it has gained popularity in recent years, coconut oil may not be the best choice for deep frying in a commercial setting. While coconut oil has a high smoke point and imparts a subtle flavor to fried foods, it can be expensive compared to other oils commonly used in commercial kitchens. Butter or Margarine: While these fats may add a rich and flavorful taste to certain dishes, they have a low smoke point and tend to burn easily. This can result in a greasy and unpleasant taste, as well as potential fire hazards in a busy commercial kitchen. Flaxseed, Walnut, and Sesame Oil: These oils are not recommended for deep frying in a commercial deep fryer. They have distinct flavors that may not be suitable for all types of fried foods, and their low smoke points make them susceptible to burning at high temperatures. Instead, use these oils in applications where their flavors can shine through, like finishing dishes and dressing salads. Deep Fryer Oil FAQ We answer common questions about deep fryer oil below: What's the Best Oil for Deep Frying French Fries? Peanut oil is one of the most popular oils for deep frying french fries. Many cooks claim that it makes french fries extra crispy and gives them a nutty flavor. How Can I Extend the Life of My Fryer Oil? In a busy restaurant, one of the key factors in making your deep fryer oil last longer is proper maintenance and care. Regularly filtering the oil and removing any food particles or debris will help extend its lifespan. How Often Should I Change My Fryer Oil? In a busy restaurant, the frequency of changing fryer oil is crucial to maintaining the quality of your fried foods. On average, fryer oil should be changed once or twice a week. This can vary depending on factors like the type of food being fried, the temperature at which it is fried, and the frequency of deep frying. Regularly monitoring the oil's color, smell, and taste can also help determine when it needs to be changed. What Should I Do With Used Oil? To ensure proper grease disposal, it is important to follow the guidelines set by local health departments. One popular method is to work with a local recycling company that specializes in used cooking oil. They can provide regular pickups and ensure that the oil is properly recycled into biodiesel or other useful products. By implementing these practices, busy restaurants can effectively manage their deep fryer oil while also being environmentally conscious. Back to Top With so many cooking oils on the market, it can be tough to choose the right one for your deep fryer. If you are marketing a healthy menu, avocado oil might be a good choice for your business. For the most convenient and affordable options, tried-and-true cooking oils like vegetable and canola will produce consistent results and need to be replaced less often.

Types of Pasta
Pasta may very well be one of the most popular carbohydrates in the culinary world. It can be served on its own with a drizzle of olive oil and a sprinkling of herbs or paired with a homemade meaty tomato sauce. It's also a central element of casseroles and soups. Other creative uses include tossing it into salads for a heartier main dish. With so many different types of pasta, you can choose from a wide array of noodle types with striking designs, various sizes, and different textures for your menu.Shop All Bulk Pasta Use the following links to explore the different types of pasta. Types of Pasta Noodles Cooking Pasta Fresh Pasta vs Dry Pasta Pasta Terms Types of Pasta Chart Pasta Color Comparison