How to Use a Vacuum Sealer
Shop All Vacuum Sealers
Use the following links to learn about vacuum sealing:
A vacuum sealer removes the air from the space around your food and then uses a heated seal bar to fuse the sides of the bag, preventing the air from leaking back into the bag. Exposure to air will spoil food or allow it to stale over time, so this process eliminates that threat.
How to Vacuum Seal
Vacuum sealing preserves and stores food items ranging from produce to full entrees. The vacuum sealing process is simple and efficient regardless of which vacuum sealer you own. Use the following instructions below to learn how to vacuum seal.
Select a suitable vacuum sealer bag for your machine.
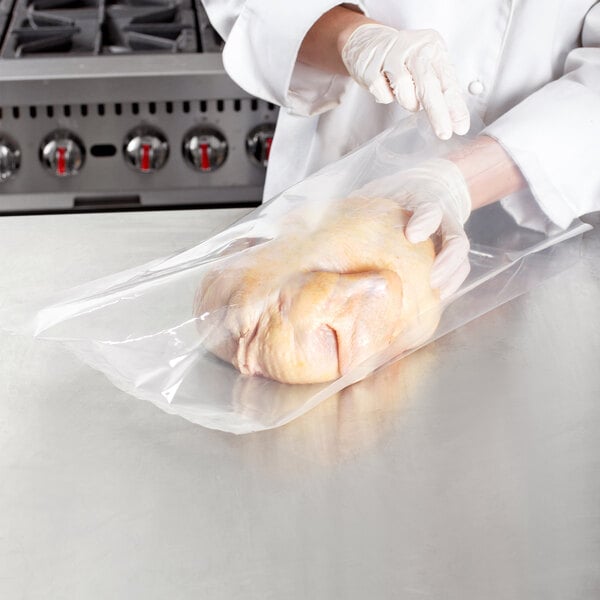
Place the food in the bag, leaving at least 2" of space between the item and the top of the pouch for a chamber vacuum sealer and at least 3" for an external machine.
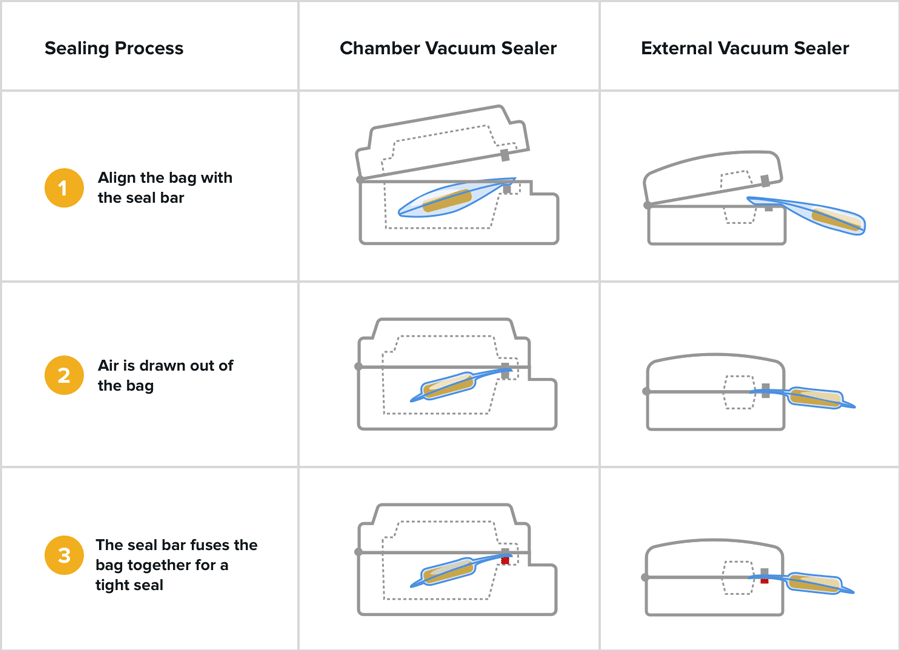
Align the open end of the bag with the seal bar on your vacuum sealer. Ensure the pouch lies flat across the seal bar and contains no wrinkles.
Close the lid of your vacuum sealer tightly. For manual machines, press the "Start" button to begin the sealing process. For automatic machines, press down firmly on the lid until the vacuum cycle begins.
Once all the air is removed, the seal bar fuses the bag to create an airtight seal. Wait until the machine indicates the process is finished before removing and storing your vacuum-sealed food.
How to Use a Vacuum Sealer Video
Watch our step-by-step tutorial on how to use a vacuum sealer:
0:00
Vacuum Sealer Chart
We've also provided you with an in-depth chart and pictures to show you how to use both a chamber and external vacuum sealer correctly:
How to Vacuum Seal Liquids
The best way to vacuum seal liquids, sauces, soups, marinades, and wet food is to use a chamber vacuum sealing machine. Chamber machines can package almost any item, including liquids and wet foods, without any extra attachments. Simply follow the same steps as you would vacuum seal solid foods!
External machines are not ideal for sealing liquid-rich foods like marinated meats, soups, and stews since the liquids tend to get drawn out of the bag with the air. Some units have a marinate button on the control panel, but this method usually requires using a canister and extends the cycle time. One way around this is to freeze the liquid before packaging it. Pour the liquid into the vacuum bag and place it upright in your freezer. Once the liquid is fully frozen, you can use your external vacuum sealer to seal the bag, following the same steps as you would vacuum seal solid foods.
Foods Not to Vacuum Seal
Do not vacuum seal mushrooms, garlic, and soft and unpasteurized cheeses like brie and ricotta. These products might contain anaerobic bacteria, which can grow and thrive within the oxygen-free environment inside a vacuum pouch.
Also, allow foods to cool to at least room temperature before sealing since higher temperatures are more likely to harbor bacteria. Take precautions and check that foods are cooling safely, keeping them out of the temperature danger zone for as long as possible.

Fresh cruciferous vegetables, like broccoli, cauliflower, cabbage, brussels sprouts, and turnips, emit gasses when stored, which can cause the airtight bag to expand over time. To prevent this, blanch the vegetables for a set amount of time before vacuum sealing. Blanching halts enzyme production to eliminate the risk of discoloration and unwanted gasses.
Chamber and external vacuum sealer machines are the two types of vacuum sealers used in a commercial kitchen. The best machine for you depends on how much sealing you intend to do, whether you need to frequently package liquids, and your budget.

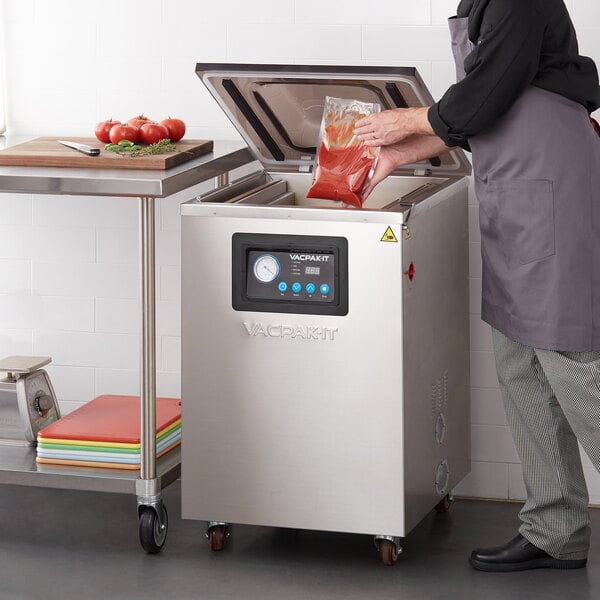
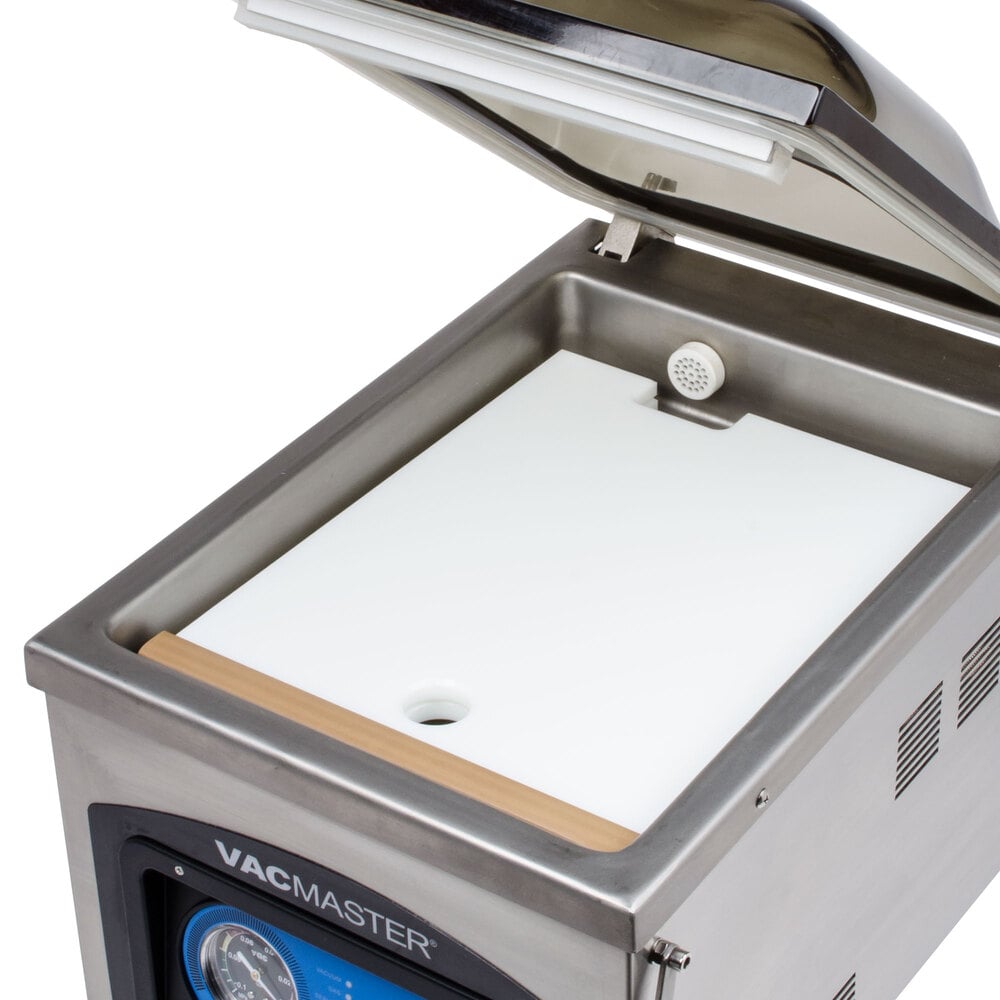
Chamber Vacuum Sealer
Best for establishments that frequently seal food and liquids in large batches, chamber vacuum sealers allow users to place food in the vacuum sealer bag inside the unit's chamber where the air is then pumped out of the chamber and bag at once for an airtight seal. It does not suction to vacuum seal bags, which makes these units the better option for vacuum packaging soups, sauces, marinades, and other liquids.
While chamber vacuum sealers have a higher upfront cost than external machines, they provide greater versatility and are better suited for high-volume commercial applications. Choose a sealer with a larger seal bar or multiple seal bars to accommodate more than one bag at a time. A vacuum sealer with an oil pump is also an option for even better performance and durability when compared to dry pump units.
- Ideal for sealing liquids
- Typically have more control over the amount of vacuum
- Best for commercial use
- Able to vacuum seal multiple bags at once
- Some units have a gas flush feature to protect delicate food
- Available in countertop and floor models
- Larger size takes up more space in a kitchen
- More expensive
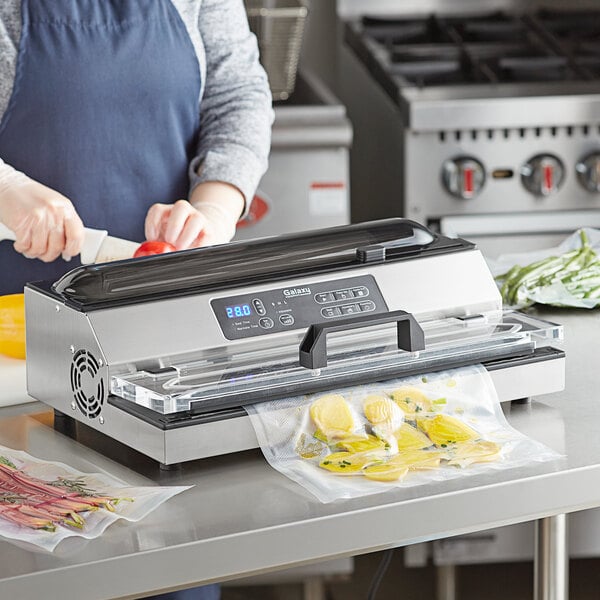
External Vacuum Sealer
Ideal for operations that occasionally seal foods, external vacuum sealers use suction to create a vacuum. The vacuum sealer bag stays outside the machine, and the machine sucks the air out of the bag to seal it.
They are less expensive to purchase than chamber machines and thus lack a lot of the versatility and high-volume performance a chamber unit can provide. Since they only have one seal bar and do not offer lengthier bar sizes like chamber machines, large batches will take longer.
- Great for small kitchens and light-duty use
- Less expensive
- Some units feature roll storage and a bag cutter to make and cut a vacuum seal bag to any length
- Not ideal for vacuum-sealing liquids
- Not well-suited for frequent, high-volume use
Manual vs Automatic Vacuum Sealers
On manual vacuum sealers, you can adjust how long you want the machine to pull air out of the bag by using a timer. This feature is helpful if you will be packaging soft, delicate items. Once you figure out the desired time, set the timer instead of holding down the pulse button every time.
On automatic sealers, the vacuum cycle runs until all of the air is pulled from the bag, which is generally faster than setting a timer. If you package more durable items, this is a more efficient system than manual ones. Combination manual and automatic machines offer both choices.
Vacuum sealers are ideal for a variety of businesses, such as a butcher shop or sustainable fish farm looking to ship their premium frozen meats to customers or a pizzeria looking to store large quantities of their signature sauce. Vacuum-sealing foods can be an easy way to streamline your kitchen and can help reduce food costs and waste in your kitchen. Let's take a look at the three main benefits of vacuum-sealing food below:
1. Extends Foods Shelf Life
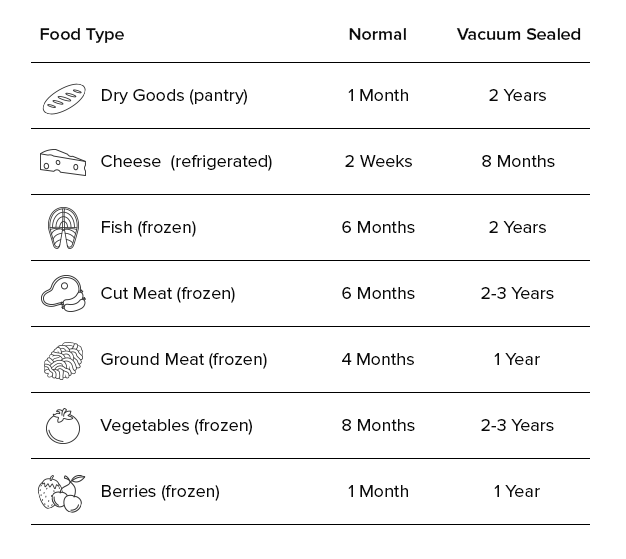
Vacuum-sealing food dramatically increases its shelf life. The exact amount of time that vacuum-sealed food will last depends on whether you are storing it in the freezer, refrigerator, or pantry. Foods that spoil quickly, such as fish, vegetables, and meats, can last an average of two to three years when vacuum-sealed and frozen, and dry goods that typically have a one-month shelf life, such as bread, can last upwards of a year when vacuum-sealed and stored in your pantry.
2. Preserves and Protects Food Quality
Removing all the air from the bag prevents bacteria growth, protects foods from freezer burn, and reduces dehydration to help eliminate food waste in your establishment. Foods will retain a higher degree of freshness for longer than traditional storage methods, and the foods are preserved naturally without chemicals. Since vacuum sealing retains the moisture and juices of the food, you may notice that vacuum packaging foods can improve their taste.
3. Maximizes Storage Space
Since vacuum sealing removes the air from the bag, vacuum-sealed food takes up less room in your refrigerator, freezer, or pantry shelves. This can help you better organize your storeroom and free up space for products in cans and boxes.
Vacuum-sealing food can extend your foods' typical shelf life by inhibiting the growth of mold, fungi, and bacteria. It also keeps food safe and fresh for when you need it. Reference the vacuum-sealed food shelf life chart below to see how long different foods last when vacuum sealed.
Besides a vacuum sealer machine, vacuum packaging bags are essential to vacuum-sealing food. However, there are plenty of other vacuum sealer accessories you can use to help streamline the process. These tools will help save you money and increase the versatility and productivity of your machine.
Vacuum Sealer Bags and Rolls
You will need to choose the right bag style based on what type of machine you have. Chamber vacuum sealer bags have a smooth texture, while external vacuum sealer bags have a mesh design that provides the extra grip the machine needs for a proper seal. Choose a bag with an open end shorter than your machine's seal bar that fits inside the chamber for chamber sealers. You can also find custom-sized vacuum sealer bag rolls that allow you to cut bags to your desired length.
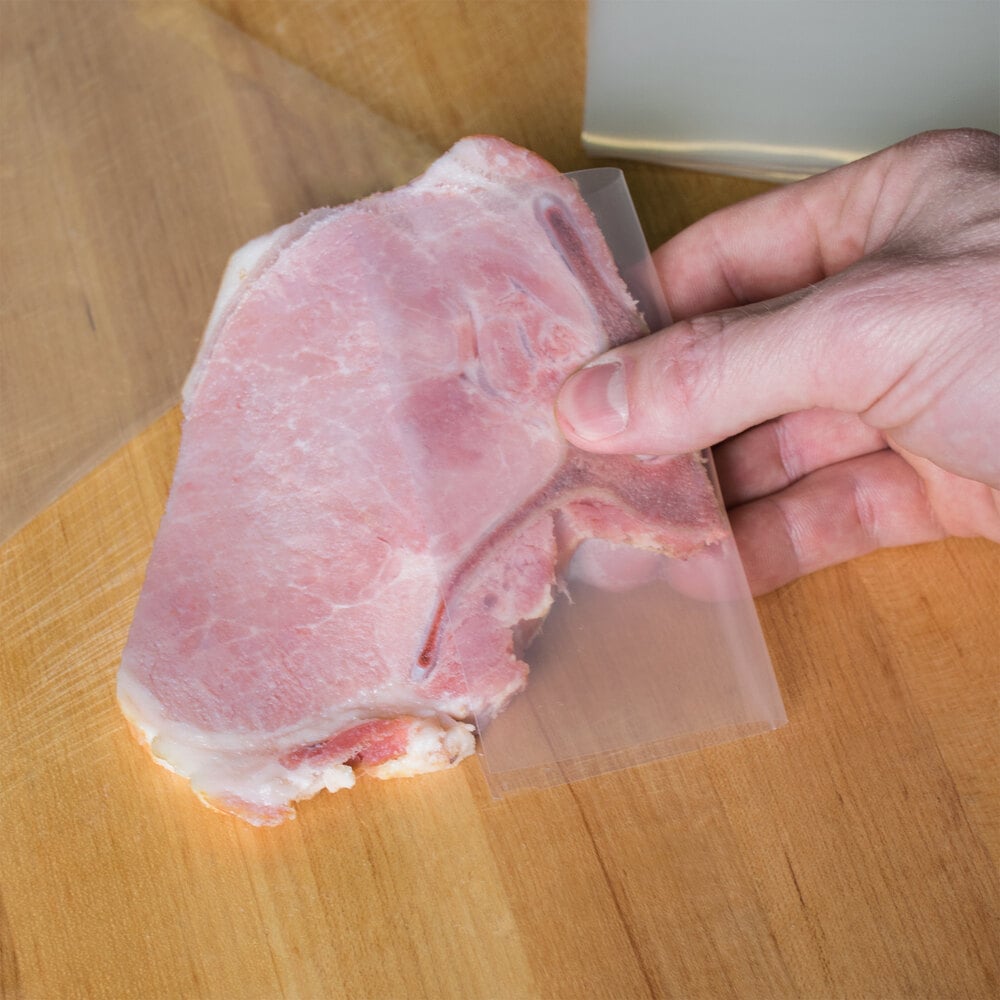
Bone Guards
Foods with sharp or hard surfaces, like bone-in meats, can puncture the bag as the machine expels the air. A bone guard provides extra padding on the problem area to soften contact with the bag as it seals and prevents the bag from ripping against the edges during the vacuum cycle.
Vacuum Sealer Filler Plates
When you want to pack small bags that don't use the whole chamber, use a filler plate to take up space and reduce the vacuum time. Using a filler plate reduces the overall time needed to seal a bag since there is less air in the chamber. It also helps the pump's longevity by reducing the necessary effort to vacuum the space. Filler plates are easy to use and only need to be placed into a chamber vacuum sealer before beginning the sealing process.
Vacuum sealers are well-known for improving the shelf life of foods, but they also make it easier to cook and reheat foods. You can use vacuum sealing to create pre-portioned meals that cut down on food waste and are easy to prepare. Sous vide, boiling, and microwaving are the three best methods for cooking or reheating vacuum-sealed food.

Sous Vide Cooking
Sous vide cooking is a process by which vacuum-sealed pouches of food are cooked in a hot water bath, with a sous vide immersion circulator regulating the water temperature. It requires very little training to produce great food, and it provides several benefits, such as consistent, repeatable results, reduced over-cooking and shrinkage, and a reduced need for fats, oils, salts, and spices.
Meat and fish are ideal for cooking sous vide style as they can marinate in their juices for enhanced flavor. Plus, overcooking foods is virtually impossible. Sous vide cooks by bringing food up to the exact temperature of the water bath, so your ingredients won't cook at a higher degree than the water's specified temperature.
Can You Boil Food in Vacuum Sealed Bags?
Boiling works very well for reheating dense, thick foods like pulled pork. Similarly to sous vide, hot water transfers heat efficiently into the food. Since you are reheating food, you can generally use higher temperatures and shorter times. If you intend to reheat your vacuum-sealed foods, make sure your vacuum sealer bags are safe for boiling before use.
Can You Microwave Vacuum Sealed Bags?
Using a microwave to reheat vacuum-sealed foods is perfect for any food sealed without much extra oil in the bag. Choose microwave-safe vacuum packaging bags to package your foods and cut a hole in the corner when reheating to allow steam to escape.
Back to TopRelated Resources

Food Dehydrators Buying Guide
Have you ever wanted to create your own jerky? Or dry citrus for cocktail garnishes? If so, a food dehydrator might be just what your business needs. A dehydrator is a useful tool for creating new menu items and reducing food waste . Our comprehensive dehydrator buying guide will take you through how a dehydrator works, how it differs from an oven, and the various purchasing considerations to help you decide on the best food dehydrator for your needs. Shop All Commercial Food Dehydrators

How to Start a Meal Prep Business
As people continue to fill their lives with busy work hours, hobbies, and family obligations, the time for creating weekday dinners becomes more difficult. A meal prep delivery business caters to those busy lifestyles, providing customers with delicious meal options that are quick and easy to prepare. Whether you want to start a food delivery business for your local community or are thinking of providing on a national level, we've listed the steps below on how to start a meal prep business. Shop All Meal Prep Supplies Learn about the meal prep business steps by clicking below: Choose Your Concept Write a Business Plan Obtain Funding Finding a Work Space Get Permits Ordering Supplies Setting Up Your Shipping Strategy Creating an Ordering Pla

Kitchen Prep Lists for Restaurants
Behind the scenes in any restaurant, there's kitchen prep work that has to be performed before the dining room opens its doors for service. During the quiet morning hours, the kitchen staff diligently washes produce , prepares ingredients, and cooks many food items ahead of time. In order to complete all tasks on time and to prep the right quantities, commercial kitchens use a production sheet called a kitchen prep list. We'll explain what a prep list is, why you need one, and how to make your own. Already familiar with prep sheets? Download our free prep list template: Prep List Template Click below to learn about kitchen prep lists: What Is a Kitchen Prep List? Kitchen Prep List Example How To Use A Prep List How To Make a Prep List What
- Topics 1344
- Industrial 55
- Troubleshooting Guides 21
- Restaurant Management 128
- Bar Management 55
- Catering Tips 35
- Bakery Management 41
- Food Trucks & Concessions 49
- Advertising & Marketing 37
- Eco-Friendly Tips 11
- Facility Layout & Design 41
- Coffee Shop Tips 27
- Installation & Maintenance 51
- Janitorial & Pest Control 30
- Safety & Sanitation 88
- Startup Tips 104
- Menu Design 10
- Kitchen & Cooking Tips 81
- Hospitality Management 23
- Pizza & Sandwich Shop Tips 36
- Smallwares 37
- Food Prep 88
- Tabletop Items 17
- Disposables 22
- Calculators & Tools 6
- Consumables 52
- Warewashing & Laundry 18
- Cooking Equipment 90
- Food Storage & Refrigeration 51
- Beverage Equipment 34
- Office Supplies 6
- Resource Type
- In-Depth Articles272
- Buying Guides296
- How-Tos93
- Product Reviews77
Join Our Mailing List
Receive coupon codes and more right to your inbox.